| 일 | 월 | 화 | 수 | 목 | 금 | 토 |
|---|---|---|---|---|---|---|
| 1 | 2 | 3 | ||||
| 4 | 5 | 6 | 7 | 8 | 9 | 10 |
| 11 | 12 | 13 | 14 | 15 | 16 | 17 |
| 18 | 19 | 20 | 21 | 22 | 23 | 24 |
| 25 | 26 | 27 | 28 | 29 | 30 | 31 |
- 블록체인
- Ethereum
- apache-spark
- python3
- lambda
- docker
- Histogram
- word count
- HelloWorld
- stopwords
- MAP
- jenv
- macbook
- RDD
- Python
- 이더리움
- Greeter
- bigdata
- web3@1.2.8
- remix
- geth
- node
- pyspark
- nodejs
- web3
- solidity
- Apache Spark
- BlockChain
- OpenCV
- Spark
- Today
- Total
이것저것 프로그래밍 정리(Macbook)
Ethereum으로 프로그래밍 - Greeter(web3@1.2.8) 본문
https://parkaparka.tistory.com/20
Ethereum으로 프로그래밍 - Greeter(web3@0.2.0)
https://parkaparka.tistory.com/12 Ethereum으로 프로그래밍 - HelloWorld 간단한 HelloWorld 프로젝트를 실행해보도록 하자. 이더리움을 이용한 블록체인 코딩을 할때 크게 4단계로 나뉜다. 1번째 스마트 컨트랙..
parkaparka.tistory.com
위 글은 greeter를 web3@0.2.0을 통해서 해본 greeter였다.
web3의 최신 버젼인 1.2.8로 greeter를 다시 해보도록 하자.
web3@1.2.8, solidity@0.5.0, node@13.8.0 의 개발 환경이다.
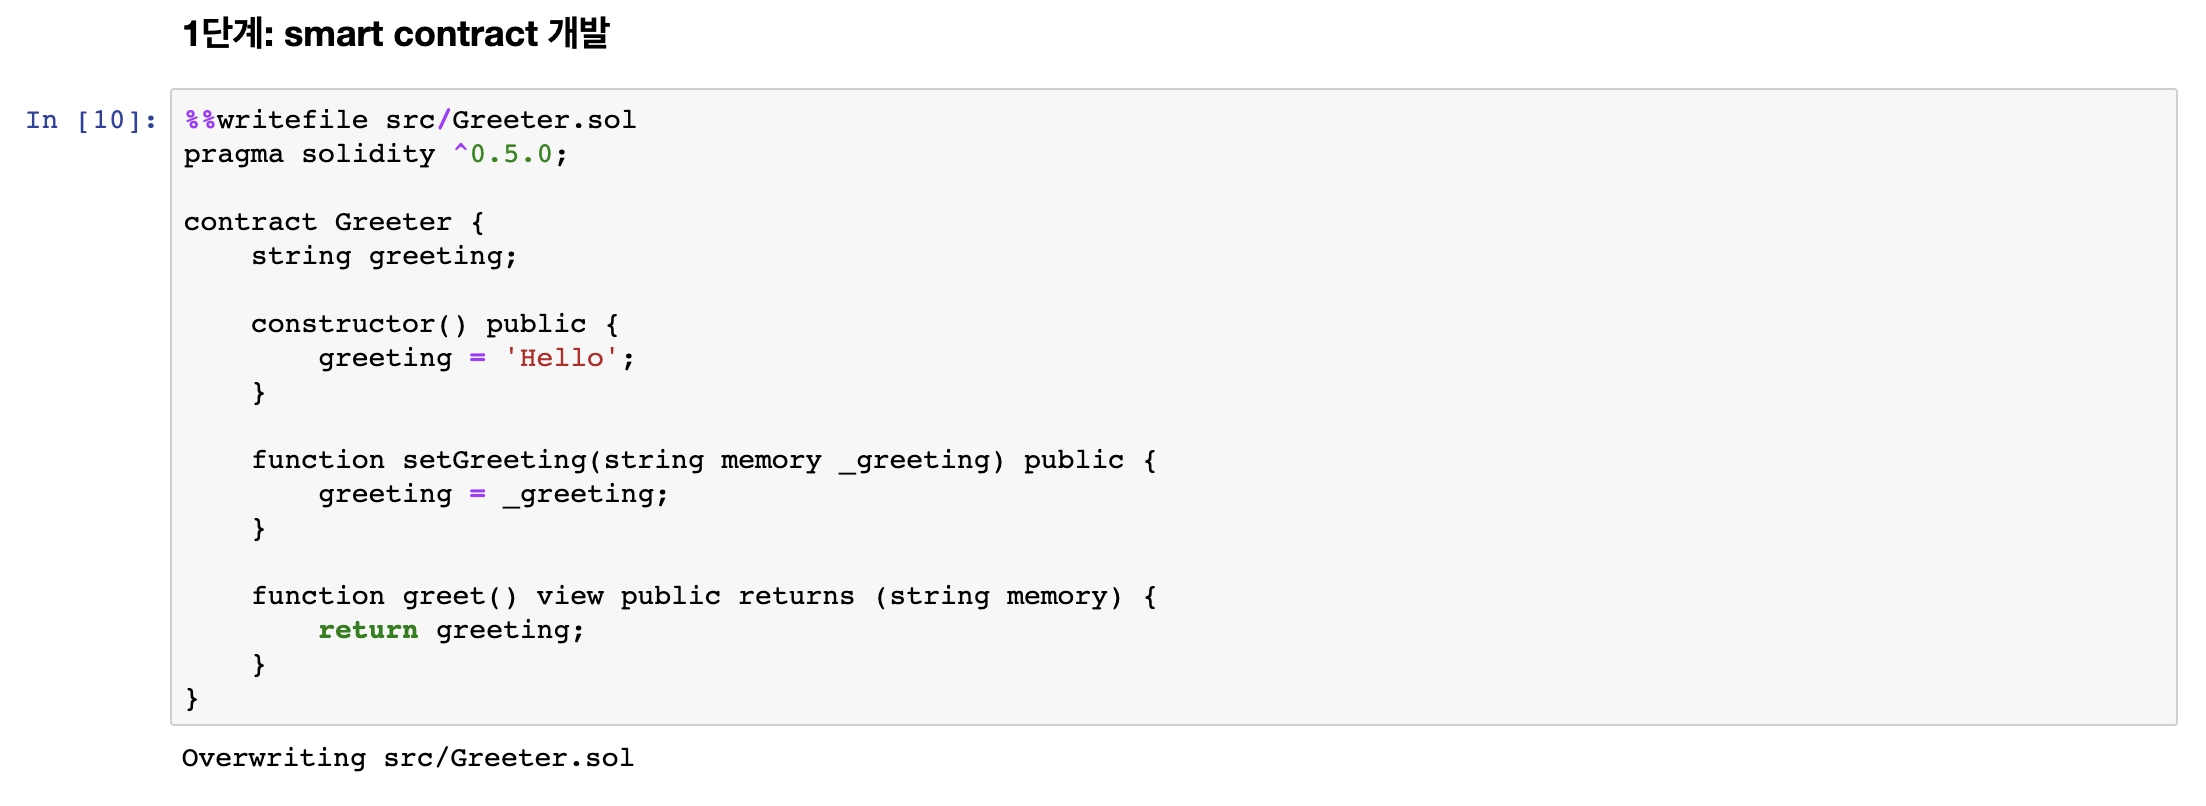
1. 스마트 컨트랙 개발
web3@0.2.0과 다를 것 없으니 빠르게 Greeter.sol 만 작성하고 넘어가도록 하자.
2. 컴파일
1단계의 스마트 컨트랙을 컴파일 하여 abi 와 byte code를 얻어오도록 하자.
solc 컴파일러를 통해 얻어올수도 있지만, 에러가 더 많이 나는 관계로 REMIX를 통해서 solidity 0.5.0 버전을통해 컴파일해서 abi 와 byte code를 얻어오도록 하겠다.
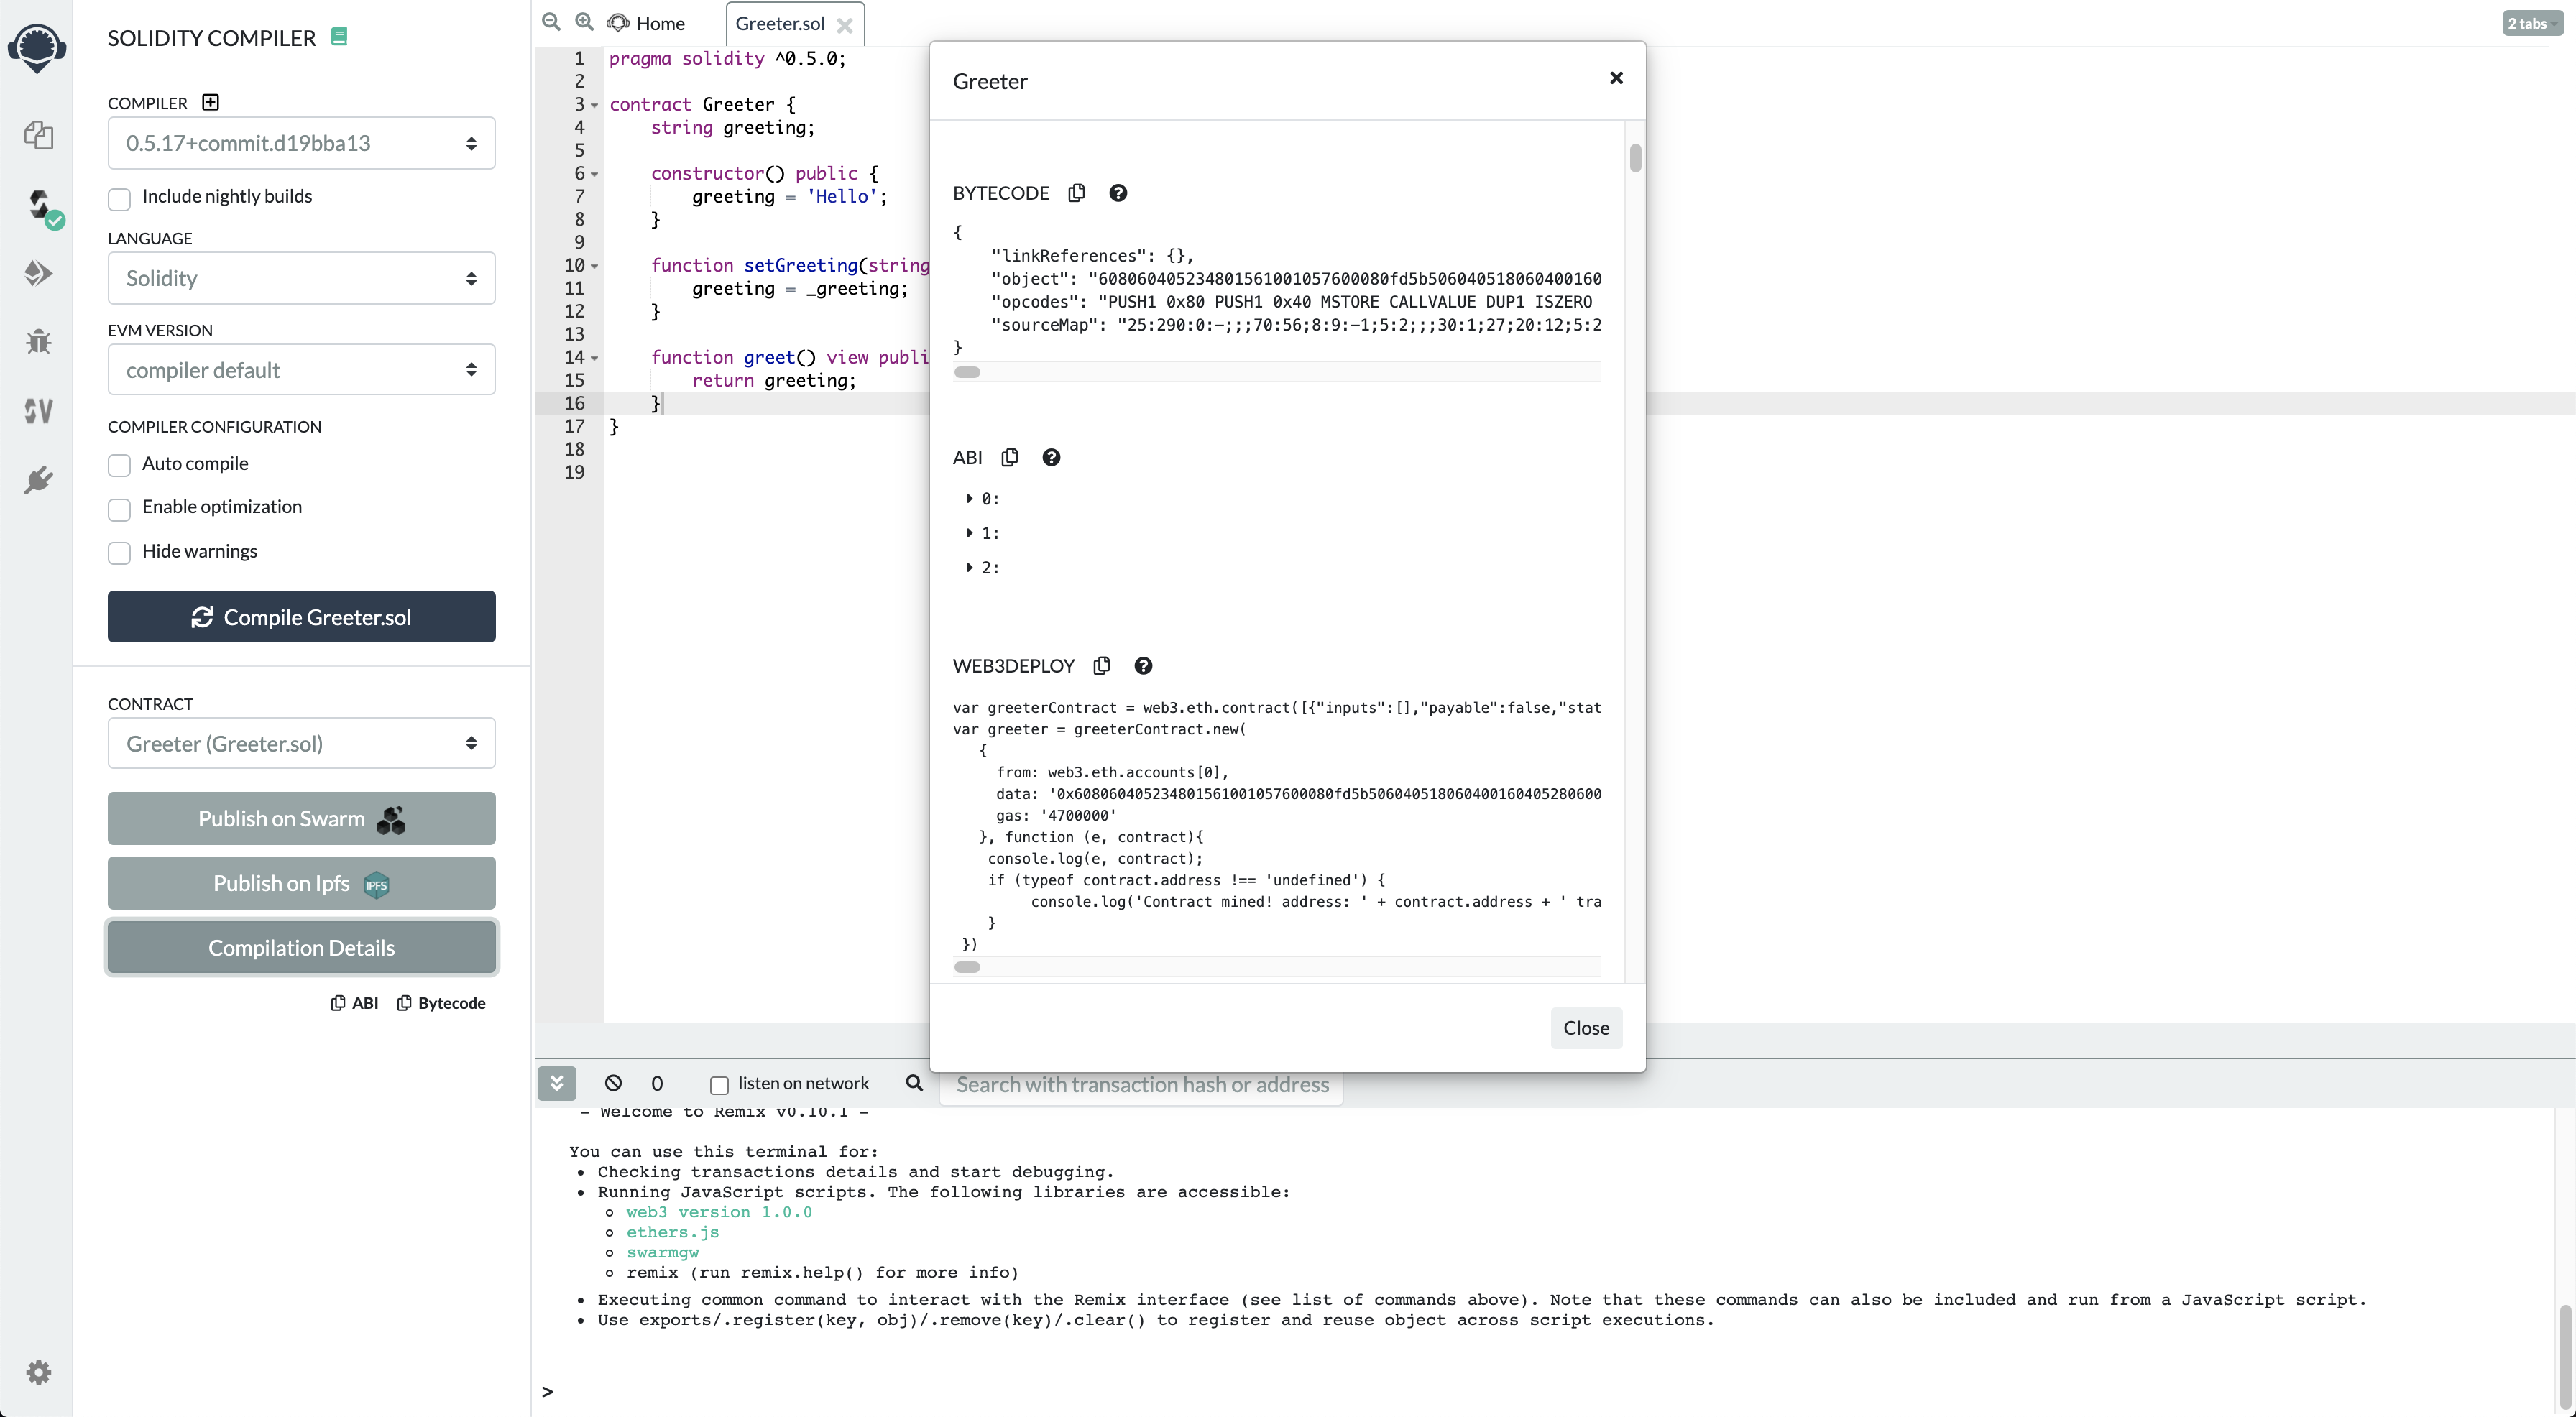
Compile Greeter.sol을 누른 후 Compliation Details를 누르면 다음과 같은 화면이 뜬다.
BYTECODE 항목에서 "objects"에 해당하는 컴파일 결과 필요한 byte code에 해당한다.
WEB3DEPLOY에서 첫번채 줄에서 web3.eth.contract([{"constant..."}]) 에서 contract 안에 json 형식으로 있는 것이 abi 에 해당한다.
컴파일 해서 얻은 abi 와 bytecode를 js 파일로 저장해두도록 하자.

3. smart contract 배포
컴파일 해서 얻은 abi 와 byte code를 갖고 배포해보자.
먼저 web3의 객체를 생성해주도록 하자.
var Web3=require('web3');
var web3 = new Web3(new Web3.providers.HttpProvider("http://127.0.0.1:8445"));
그 다음 abi 와 byte code를 선언해 주도록 하자.
var abi = [{"constant":false,"inputs":[{"name":"_greeting","type":"string"}],"name":"setGreeting","outputs":[],"payable":false,"stateMutability":"nonpayable","type":"function"},{"constant":true,"inputs":[],"name":"greet","outputs":[{"name":"","type":"string"}],"payable":false,"stateMutability":"view","type":"function"},{"inputs":[],"payable":false,"stateMutability":"nonpayable","type":"constructor"}]
var _bin = "608060405234801561001057600080fd5b506040805190810160405280600581526020017f48656c6c6f0000000000000000000000000000000000000000000000000000008152506000908051906020019061005c929190610062565b50610107565b828054600181600116156101000203166002900490600052602060002090601f016020900481019282601f106100a357805160ff19168380011785556100d1565b828001600101855582156100d1579182015b828111156100d05782518255916020019190600101906100b5565b5b5090506100de91906100e2565b5090565b61010491905b808211156101005760008160009055506001016100e8565b5090565b90565b610336806101166000396000f3fe60806040526004361061004c576000357c0100000000000000000000000000000000000000000000000000000000900463ffffffff168063a413686214610051578063cfae321714610119575b600080fd5b34801561005d57600080fd5b506101176004803603602081101561007457600080fd5b810190808035906020019064010000000081111561009157600080fd5b8201836020820111156100a357600080fd5b803590602001918460018302840111640100000000831117156100c557600080fd5b91908080601f016020809104026020016040519081016040528093929190818152602001838380828437600081840152601f19601f8201169050808301925050505050505091929192905050506101a9565b005b34801561012557600080fd5b5061012e6101c3565b6040518080602001828103825283818151815260200191508051906020019080838360005b8381101561016e578082015181840152602081019050610153565b50505050905090810190601f16801561019b5780820380516001836020036101000a031916815260200191505b509250505060405180910390f35b80600090805190602001906101bf929190610265565b5050565b606060008054600181600116156101000203166002900480601f01602080910402602001604051908101604052809291908181526020018280546001816001161561010002031660029004801561025b5780601f106102305761010080835404028352916020019161025b565b820191906000526020600020905b81548152906001019060200180831161023e57829003601f168201915b5050505050905090565b828054600181600116156101000203166002900490600052602060002090601f016020900481019282601f106102a657805160ff19168380011785556102d4565b828001600101855582156102d4579182015b828111156102d35782518255916020019190600101906102b8565b5b5090506102e191906102e5565b5090565b61030791905b808211156103035760008160009055506001016102eb565b5090565b9056fea165627a7a723058201ff5b2340449e4c2a498f18af42bdd94ed2f7ed97e3460664df86c347bc7f5390029";
이후 abi를 사용해서 smart contract의 객체를 생성해 주도록 하자. 여기서 web3@0.2.0 랑 차이점이 있으니 유의해서 보도록 하자.
var greeterContract = new web3.eth.Contract(abi);
그러고 나서 생성된 smart contract의 객체를 byte code를 사용해서 배포해 주도록 하자.
.send() 안에 from에는 coinbase의 주소를 직접 입력해주면 된다. web3@0.2.0에서는 web3.accounts[0]로 계정을 불러올수 있었지만, web3@1.2.8에서는 이것이 불가해서 직접 주소를 입력해 줘야 한다.
greeterContract.deploy({data:"0x" + _bin}).send({from:"0x36ea6a51fc997afdd9371fbd056a001d2a1c6f98", gas: 364124, gasPrice:'1000000000'}).then(function(newContractInstance){console.log(newContractInstance.options.address)});
이것을 하나의 .js 파일로 합치고 실행해보도록 하자.
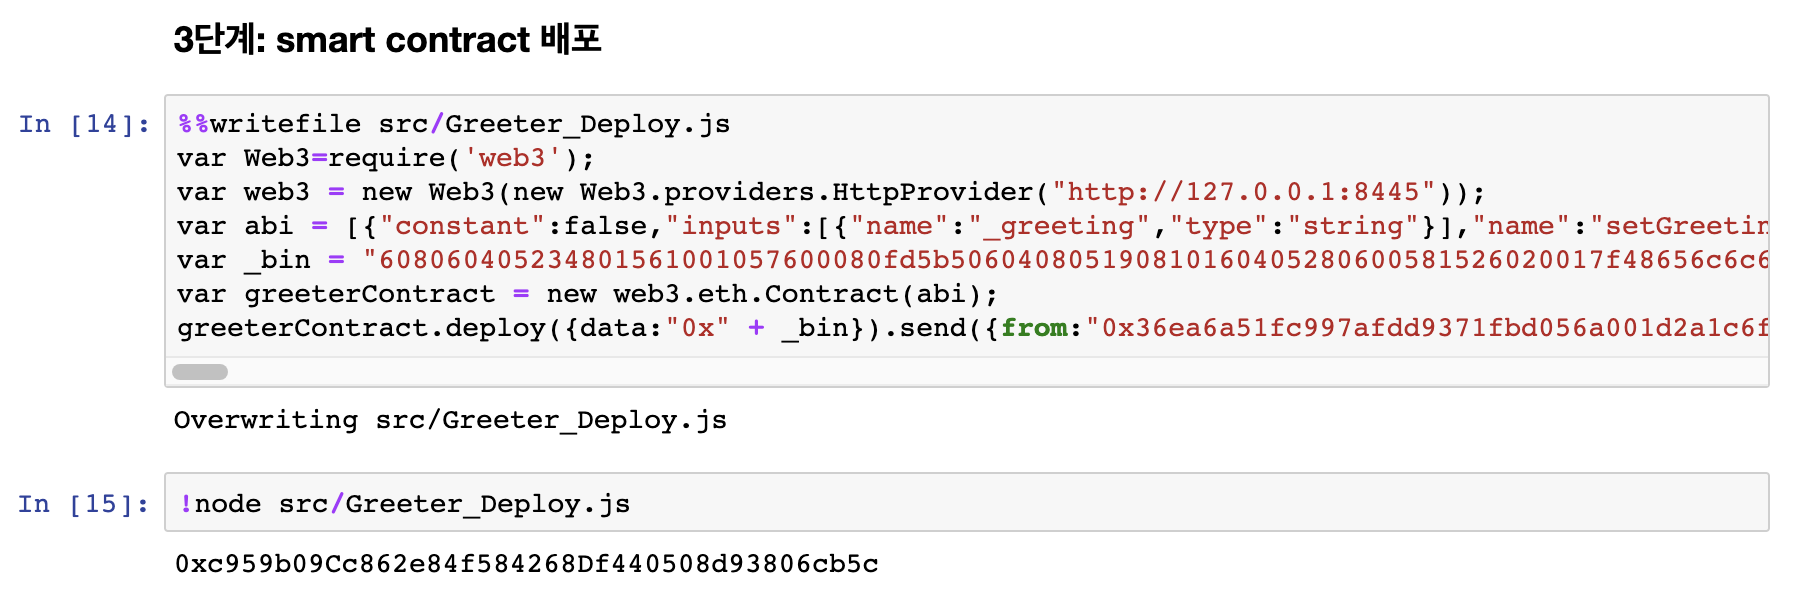
위 항목들을 하나의 Greeter_Deploy.js 파일로 작성하고 다음 명령어를 통해 실행해 주도록 하자.
!node src/Greeter_Deploy.js
위 사진처럼 밑에 contract의 주소값이 뜨는 것이 아니라 옆에 * 표가 떠 있는 것을 확인 할 수 있을 것이다.
이제 geth 창에서 pending 되어 있는 transaction을 확인하고 mining을 해서 배포를 마무리 해보도록 하자.
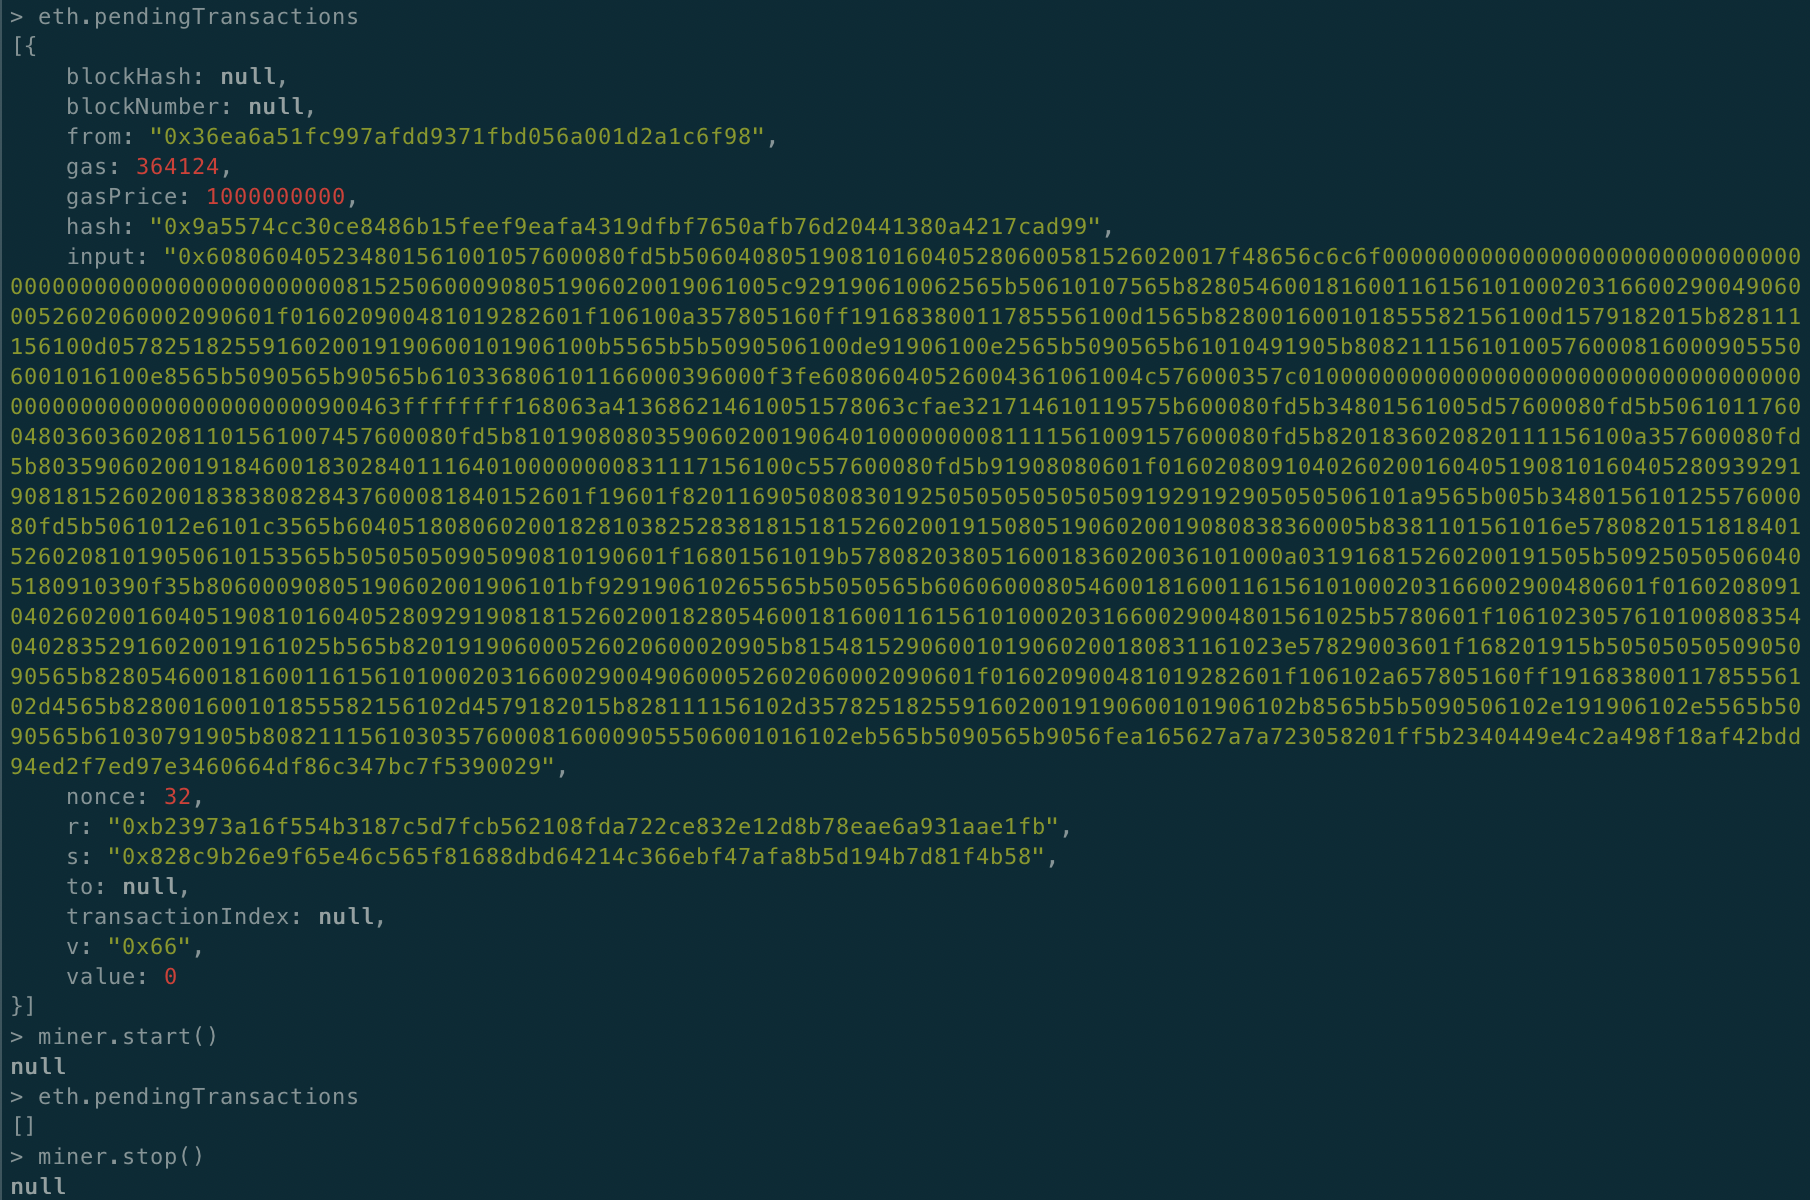
eth.pendingTransactions 를 통해 pending 되어 있는 Transaction을 mining을 통해 배포를 마무리 한것이다.
배포가 끝나면 배포된 contract의 주소를 확인 할 수 있다.

4. 사용하기
먼저 위에서와 같이 web3의 객체를 생성해주도록 하자.
var Web3 = require('web3');
var web3 = new Web3(new Web3.providers.HttpProvider("http://127.0.0.1:8445"));
이후 abi 와 위에서 얻은 contract의 주소를 명시해 주도록 하자.
var abi = [{"constant":false,"inputs":[{"name":"_greeting","type":"string"}],"name":"setGreeting","outputs":[],"payable":false,"stateMutability":"nonpayable","type":"function"},{"constant":true,"inputs":[],"name":"greet","outputs":[{"name":"","type":"string"}],"payable":false,"stateMutability":"view","type":"function"},{"inputs":[],"payable":false,"stateMutability":"nonpayable","type":"constructor"}]
var addr = "0xc959b09Cc862e84f584268Df440508d93806cb5c";
그러고 나서 abi 와 addr을 이용해서 블록체인에 생성되어 있는 객체를 얻어오도록 하자.
var greeter = new web3.eth.Contract(abi,addr);
이제 위에것들을 이용해서 node창에서 greeter 컨트랙을 이용하면 된다.
그전에 위에 항목들과 node창에서 쓸 내용들을 .js 파일로 저장해 놓도록 하자.

이제 실제로 node 창에서 어떻게 실행하는지 봐 보도록 하자.
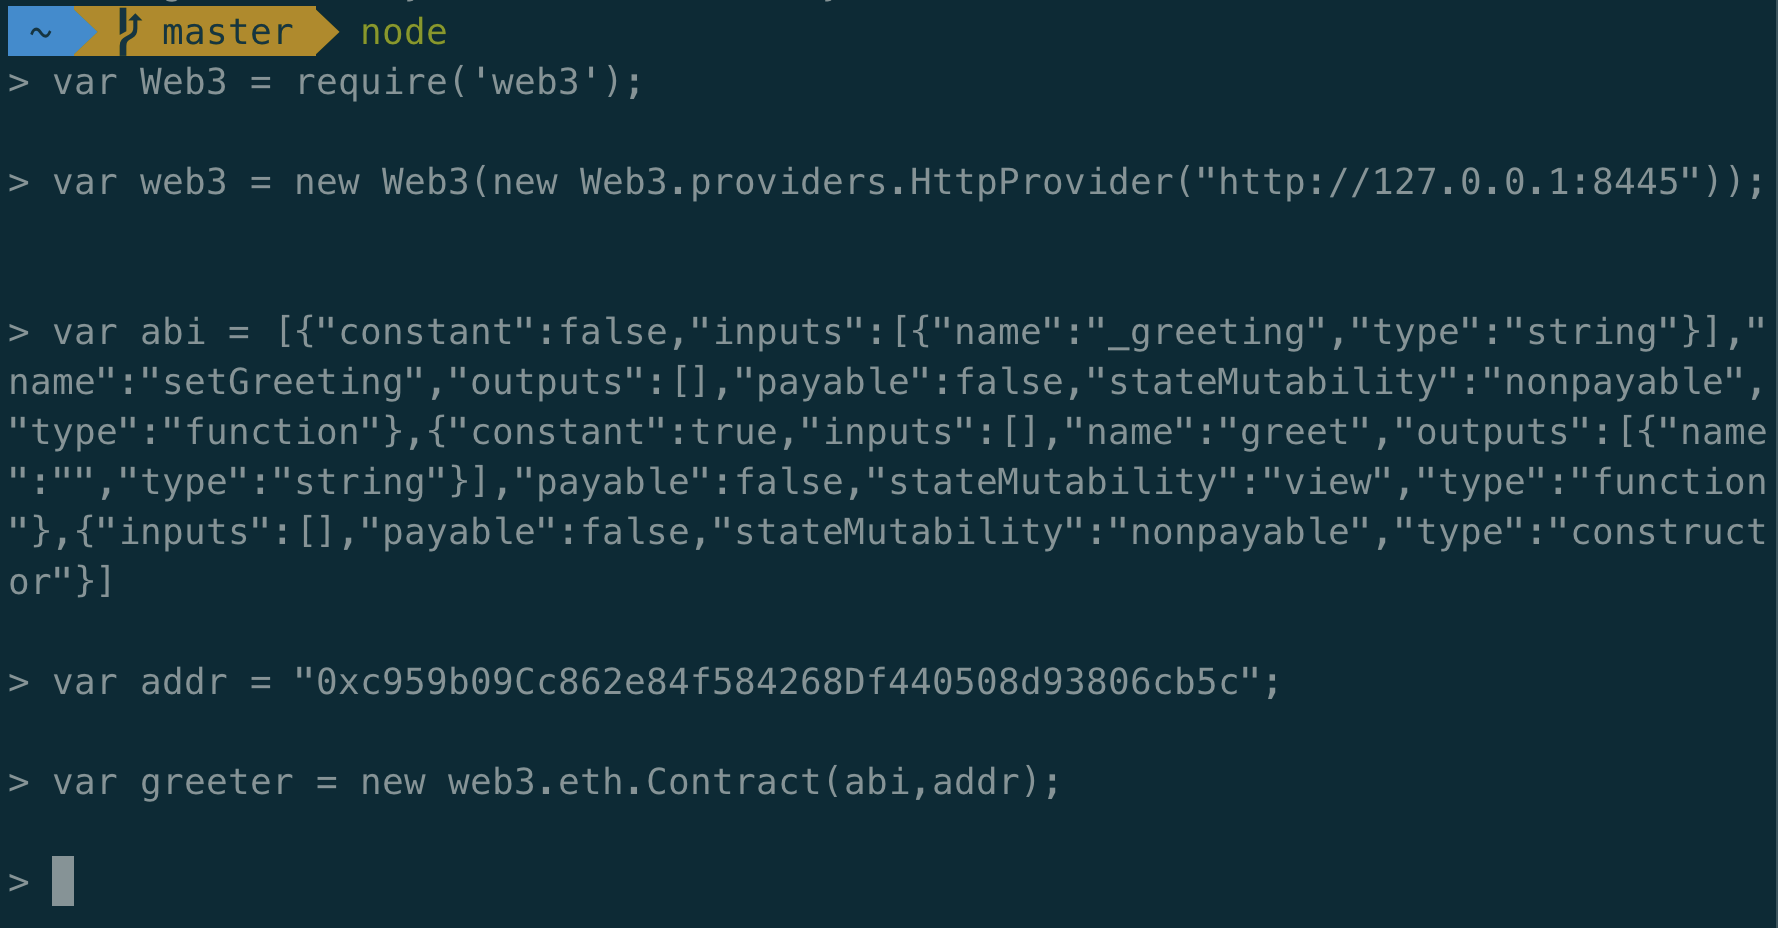
greeter 객체를 생성했으니 그 안의 함수들을 사용해보자.

greeter 안에 call 함수인 greet()과 send 함수인 setGreeting()이 있는 것을 확인 할수 있다.
먼저 greet()을 통해 안에 들어있는 인사인 "Hello"를 확인해 보도록 하자.
web3.eth.personal.unlockAccount("0x36ea6a51fc997afdd9371fbd056a001d2a1c6f98","1234");
그전에 자신의 계정을 unlock 해주도록 하자. 앞에는 자신의 coinbase 계정을 직접 입력해주고, 뒤에 "1234" 대신 자신의 비밀번호를 넣어주면 된다.
이제 greet() 함수를 실행해 보도록 하자.
greeter.methods.greet().call().then(function(value) {console.log(value);});
위 명령어를 node창에 치면 cal() 함수이기 때문에 mining 없이 결과값을 확인 할 수 있다.

이제 "Hello"를 다른 문구로 바꿔 보도록 하자.
greeter.methods.setGreeting("Hello Parkparka").send({from:"0x36ea6a51fc997afdd9371fbd056a001d2a1c6f98",gas:100000});
"Hello Parkparka"라는 문구로 바꿔 보도록 하자. setGreeting() 함수 send() 함수 이기 때문에 coinbase와 gas비용을 언급해줘야 한다.
send() 안에 from에 자신의 coinbase 계정을 직접 입력해주면 된다.
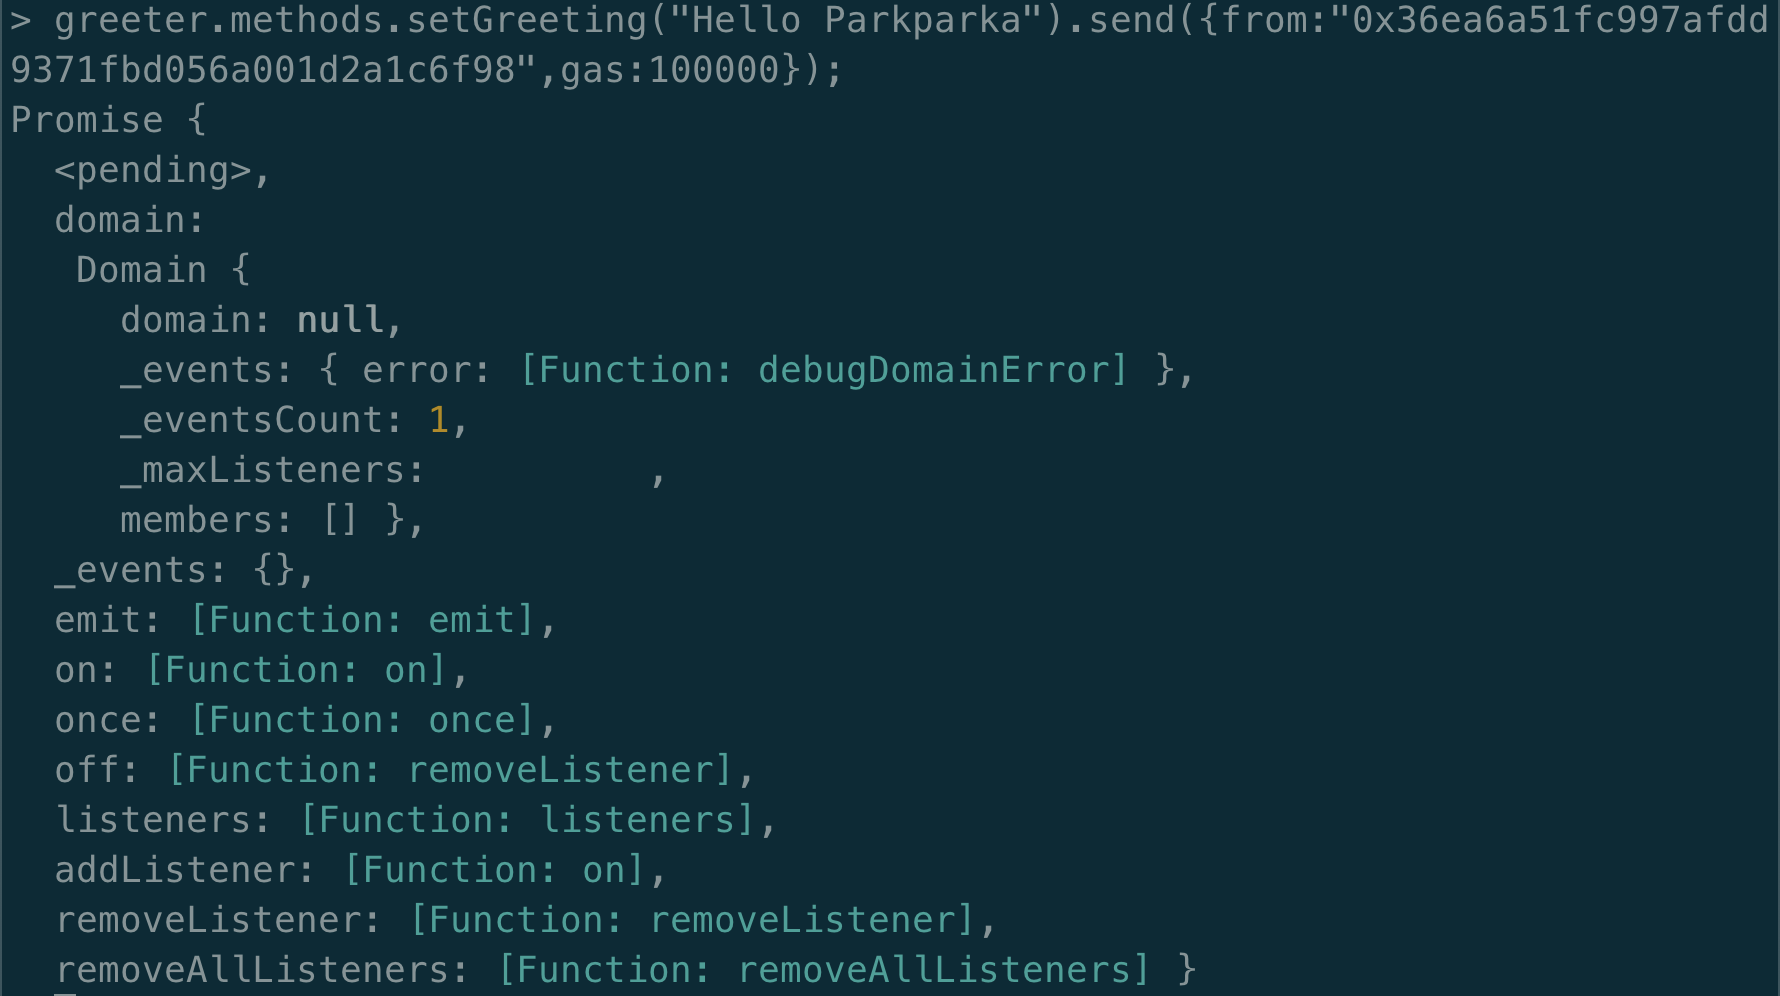
이후 geth창으로 이동하여 현재 pending 되어 있는 transaction을 확인 후 mining을 해주도록 하자.
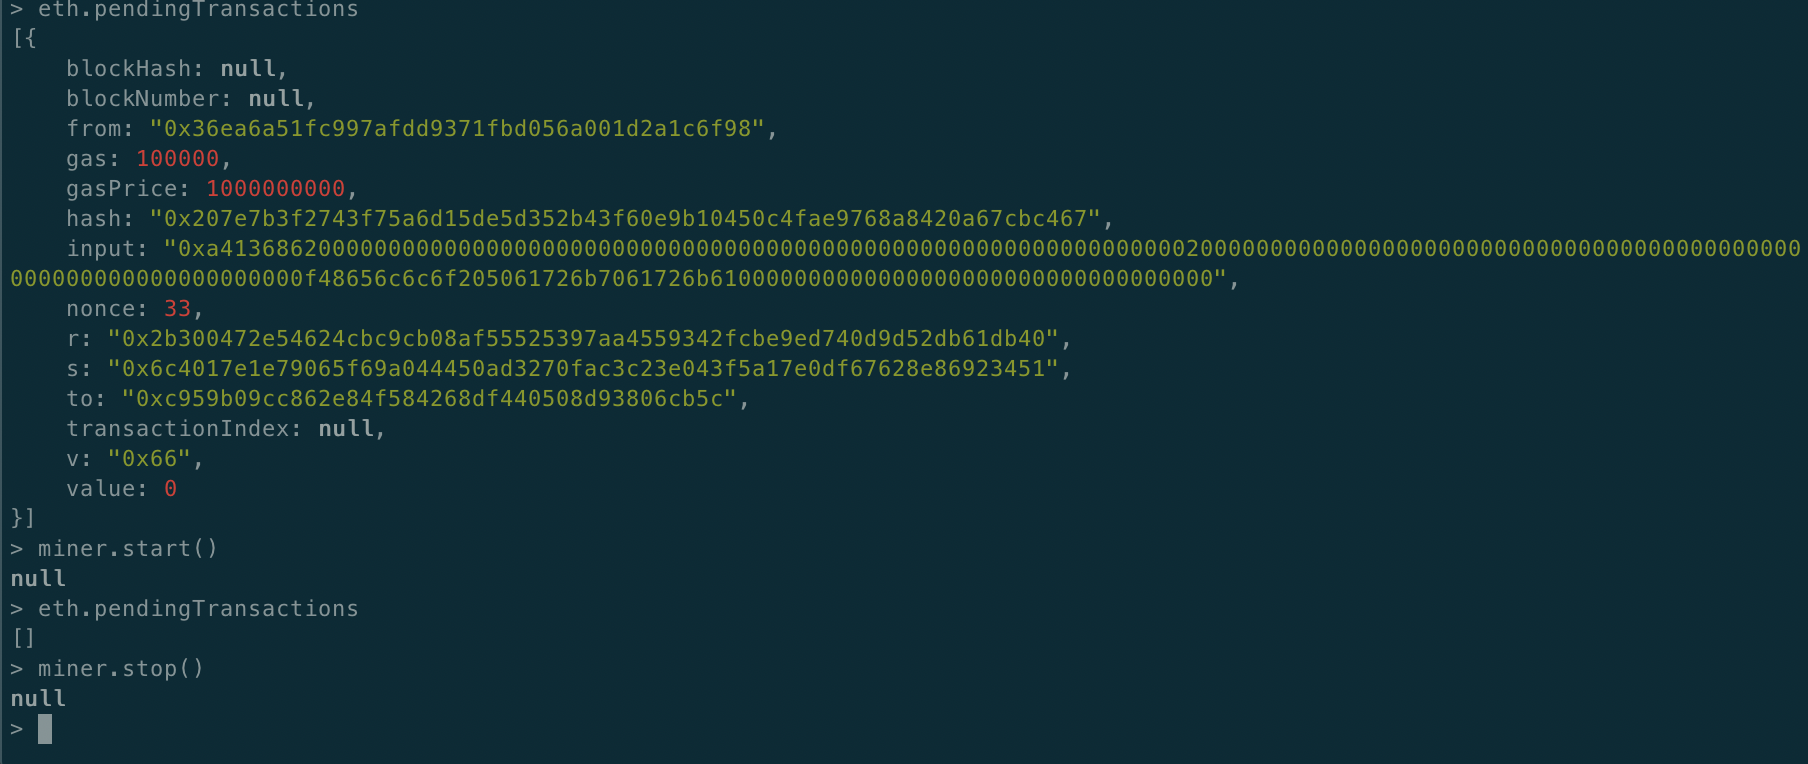
다시 node 창으로 넘어와서 문구가 바뀌었는지 greet() 함수를 통해 확인해보자.

확인 결과 "Hello Parkparka"로 바뀌어 있는 것을 확인 할 수 있다.
다음 글에서는 계수기(Counter)를 만들어보도록 하자.
'ethereum(blockchain)' 카테고리의 다른 글
| Ethereum으로 프로그래밍 - Counter(web3@1.2.8) (0) | 2020.06.02 |
|---|---|
| Ethereum으로 프로그래밍 - HelloWorld (web3@1.2.8) (0) | 2020.05.30 |
| Ethereum으로 프로그래밍 - Greeter(web3@0.2.0) (0) | 2020.05.19 |
| Ethereum으로 프로그래밍 - HelloWorld (web3@0.2.0) (0) | 2020.03.16 |
| Ethereum으로 프로그래밍 - ethereum 네트워크, 사설망 구성해보기 (0) | 2020.03.05 |


